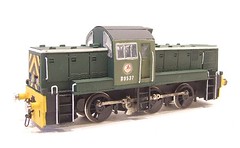
By the skin of its teeth, the Class 14 has made it to Warley. Yesterday I received the final parts, some lozenge shaped items for the top of the long bonnet. A bit of an experiment ensued – how many coats of paint can I apply in two hours and are they enough to cover the whitemetal.
Luckily the answers were 3 and yes. After a quick shot of matt varnish you couldn’t tell that they hadn’t been on there when I first painted the model.
Coupling are Romford screws – with everything behind the buffer beam chopped off otherwise the chassis won’t go in. Buffers are Gibson – soon they will get oval heads but they weren’t available at the time. Unless you know they look OK though.
The locomotive was delivered to Trevor this afternoon during the set up session at the NEC and he is very pleased with it. Go along to the show and have a look, then let me know what you think.
As an aside, this is the 500th post on the blog. I’m a bit chuffed with this – the current rate of posting is about 250 entries a year, which is higher than a lot. My Flickr account, which hold the photos used is pretty full as well. I suppose I ought to try and say something profound but that would just be rubbish or turn into a rant and I have at least one of those lined up for the future anyway.
Apart from the fun of writing this stuff, now I have enough of an archive it’s fun to take a look back and see what I was doing a year ago. Time certainly flies when you are having fun and I’m amazed to see that this time 2006 I was fixing my campervan, especially as I’ve just got it back from having the front beam replaced. Some things never change !
So here’s to another 500 with all the burnt fingers and pointless frustration that will occur getting there.
Friday, November 30, 2007
Thursday, November 29, 2007
Out of the box
This weekend I’ll be spending my time sat behind a demonstrating table at the Warley Model Railway show held at the NEC.
Our stand will be called “Stepping beyond the Train Set”. The idea is to help people playing with trains make the difficult step from simply buying stuff and running it, to actually modelling. In other words encouraging visitors to get their hands dirty making stuff.
Obviously we can’t take one of the big layouts but the Melbridge Box Company will do the job rather nicely. It contains a microcosm of all the elements you can aspire to – trackbuilding, scenics, scratchbuilding structures, detailing, weathering and more.
I’ll be building wagon kits to pass the time between visitors and my Dad will be assembling Superquick buildings. None of this will be desperately finescale but that’s the point. If you want to work to the highest standards then there are other people who can help you. What you need is to take that first step, and we want to be there to hold your hand.
Wednesday, November 28, 2007
Questions, questions
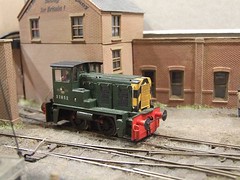
Christopher asked a few questions about the Class 14 diesel:
Was there much preparation needed on the body before putting on the primer/undercoat?
No. All I did was scrub the model down with Shiny Sinks cleaner followed by a wash in washing up liquid and lots of rinsing in cold water to get any residue of the cleaner off. Then it was dried off with a hair dryer.
(White or grey? Acrylic or cellulose?)
Eastwood self etching primer from Frosts. Available in grey, but quite a pale grey. The yellow paint covered nicely over it in a couple of coats. I think you should get about 15 models out of a can of primer easily enough. Double that if you only dust it on like proper modellers do.
Whose green and yellow paints did you use? Railmatch?
Both greens are Railmatch paints which sprayed very nicely. All other colours from the Humbrol enamel range as I find they brush so well even when past their best. Humbrol satin varnish finished the job.
How about the transfers?
Numbers from Fox. Crests from the depths of my transfers folder. All waterslide.
Tuesday, November 27, 2007
Loads of paint
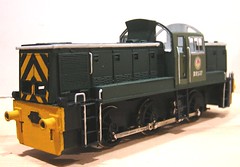
Where to start ? A bit of a hectic day.
First, the dark green paint was sprayed. This was left to harden for a couple of hours before the black bits were hand painted from a slightly suspect Humbrol tin. Then yellow buffer beams were given a second coat. Next the white handrails went on with a white/147 mix. Finally the silver window frames. A bit of touching up with greens and the job looked good.
Transfers were the usual fiddly pain to apply with lots of prodding with a fine, wet paint brush to get the numbers something like in line with each other.
Next the wasp stripe nose doors which had been painted separately were glued in place. I was ever so glad these could be done in the flat as painting hazard stripes is no fun at the best of times. Transfers would be best for this job but I didn’t have any in 4mm scale to hand.
Finally the whole model was sprayed with satin varnish. This brought all the colours together and made the dark green come alive.
Actually, now I write it down this doesn’t seem like much work but it certainly seemed like a lot of effort at the time.
Monday, November 26, 2007
Putting on a mask
How long does paint need to harden before you can stick tape to it and be confident that you aren’t going to peel it off ?
In this case, about 12 hours. Normally I’d prefer 24 but that’s not an option with this deadline. Besides, I've taken a day off work to do this and a couple of other things and I didn’t want to waste it waiting for enamel to dry.
Working out what colour goes where is a bit of a game. The change on these locomotives between light and dark green varies. My prototype is the one on the front cover of my OPC book. Partly because it’s one of the few colour pictures I have and mostly because it’s the easiest one to mask up. Many locos had the light green on the cab front and getting a good tight line would be tough.
As it was the hard lines were masked using the relatively expensive Tamya tape and then filled in with the cheaper stuff. I pushed this lot down as hard as dare. The cab handrails got in the way a bit but some careful cutting of thin strips seemed to work.
Removing the masking is always a bit of a heart in mouth moment but this time I got away with it. The sides of the cab remain Sherwood Green with a nice clean break into the darker BR loco green.
Now I just have to wait for the main colour to dry a bit so I can touch in the little bits by hand.
Sunday, November 25, 2007
Sticky stuff
Glue is good. I know lots of modellers hate the stuff but for some jobs I can’t think of anything better.
The Class 14 diesel is covered with overlays. There are two layers of bonnet side doors, tops for the side boxes, grilles and other bits of metal to be added. I know this can be done with solder, I’ve done it myself in the past, but it’s a pain and today I wanted an easy life.
One of the reasons glue isn’t popular with “proper” modellers is that they don’t think it will last. My experience is that you get over 10 years if you use a decent modelling glue and not some cheap stuff from a market. Whitemetal models I’ve built using it have lasted and not returned to kit form so it’s not unreasonable to expect the same performance for the bits on this kit.
Another advantage is that if something comes off, it comes off whole rather than bent. A dab of glue and it goes back on just as quickly, often without needing a re-paint.
My preferred glue for this job is Zap-a-Gap green superglue. It comes in a nice big controllable bottle and takes a few seconds to grab allowing for a little repositioning. For the really fiddly bits, the glue is put on a bit of scrap plastic and applied with a pin. The pool stays liquid for a few minutes and the pin lets me put tiny amounts on, or run the stuff between laminations using capillary action.
Saturday, November 24, 2007
Soldering on
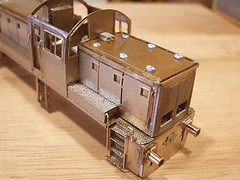
I’ve been busy today. The whole afternoon has been devoted to getting the Class 14 a lot closer to being finished than it was. Solder fumes have filled the air (I have a desk fan to blow them away from my nose as they can’t be good for me) and fingers have been singed. I think though, that I have finished soldering on the body.
Tough bits ? Well the cab floor should go in at an earlier stage than I did it – a bit of work with a piercing saw got me out of the hole but not being in it would have been better. The ends are fun – guess who didn’t really leave enough space behind the handrails on the front.
Both high and low melt solder were used but mostly with a normal iron. If you are quick enough and the castings are chunky enough this isn’t a problem. Just don’t hang about.
Apart from that it all went well. The model seems a bit blank still but that’s because I plan to glue most of the overlays on. That’s tomorrow’s job.
Friday, November 23, 2007
Handrails
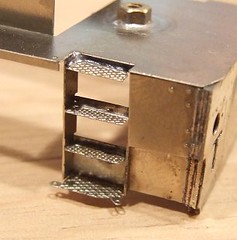
Head scratching time. The handrails on a Class 14 diesel are weird. Basically they are a flat strip that runs around the edge of the bonnet. Quite why the ex-GWR workshop went for these I don’t know, but it’s bad news for modellers. We know how to do conventional rails, how are these supposed to work ?
In the 7mm scale version of the kit, builders fit short handrail knobs and then solder the flat strip provided to the tops. With a bit of excess solder you won’t spot the subdefuge.
In 4mm this won’t work as the supports will be too think. After a little discussion the plan was to drill holes in the strip. Short lengths of wire are then soldered in and the result clipped in place through the suppled holes in the bonnets.
That’s what I did for the short end. Blimey that nickel silver is hard. I chewed through several drill bits and even when I finished there was a problem with the holes lining up.
For the long end I tried something that shouldn’t work. The short lengths of wire were soldered to the bonnet. Then, using a ruler as a thickness guide, they were all snipped to the same length. Finally the strip was soldered to the ends of the wire.
I suspect this works because I was quick with the iron and the solder stick strip to wire before the solder holding the wire to the bonnet had time to heat up and melt.
The results from both methods are suprisingly strong. I filed things clean without any breakage. In future I’ll use the second method but if you were better at measuring and drilling than I am, the first will work OK.
Wednesday, November 21, 2007
Brass in Bonnet
The solution to over-hard metal is to use something softer and that’s what’s happened. A set of brass bonnets have been supplied – pre-bent to help me out even more. I quickly attached them to the loco and added the boxes on the side making sure that they didn’t stick over the side.
One feature of the kit is a whole host of overlays. I think I’ll be sticking these on with glue as it’s easier and quicker that solder. Once painted no-one will know. There is a bit more soldering to do, cab steps and handrails once I’ve worked out how the later work.
One feature of the kit is a whole host of overlays. I think I’ll be sticking these on with glue as it’s easier and quicker that solder. Once painted no-one will know. There is a bit more soldering to do, cab steps and handrails once I’ve worked out how the later work.
Tuesday, November 20, 2007
Bending bonnets
Normally I prefer etched kits to be produced in nickel silver. It solders well and is generally pleasant to use.
However it’s a hard metal and that caused me major grief when I tried to bend the bonnets. My first attempt resulted in breaks along the fold lines even though I’d deepened the relieving lines on the back. If I’d got things right straight away I might have got away with it but not this time.
The longer bonnet was annealed before bending but even this didn’t help much. Getting the bend in the right place proved impossible. At the front the large hole for the fan doesn’t help.
I rang Trevor to get spare etches and discuss the problem. When I built the early brass version of this model I didn’t recall any problems, but then this is a softer and less brittle metal.
His solution – a set of brass bonnets will be produced and supplied. The purchaser then has the choice of materials to play with. A proper pragmatic solution, which justifies the effort of building the test, etches.
Sunday, November 18, 2007
Early days of a new project
For what seems like months but may be over a year, we’ve been planning to extend Flockburgh with a short scenic board. The woodwork has been around for ages but this week, a start has been made.
First job (for my Dad, not me. Some of us have to go to work) was to dismantle the board and rebuild it with a big step for a harbour entrance. We think this now has the right proportions. All it needs is some scenery – a nice little Christmas project I think…
First job (for my Dad, not me. Some of us have to go to work) was to dismantle the board and rebuild it with a big step for a harbour entrance. We think this now has the right proportions. All it needs is some scenery – a nice little Christmas project I think…
Saturday, November 17, 2007
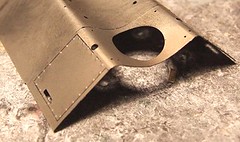
Stepping up
You have to marvel at the kit designers art sometimes. The steps for the Class 14 are a case in point. They are a real bit of nickel silver origami. I can’t even begin to describe what you get from a flat sheet of metal, suffice to say that only the upper treads had to be soldered on, everything else was formed by bending.
Once you get your head around it, the job is easy with small flat-ended pliers. I could use the “Hold’n’fold” but it’s overkill for a little job like this. Amazingly the Stanley pliers I use came from a pound shop – useful tools don’t have to be expensive.
OK, so the treads are fiddly. Lots of flux and a small amount of solder are the order of the day ‘cos cleaning an excess off will be difficult. With 3 per corner and four corners to do, practise does make perfect.
Thursday, November 15, 2007
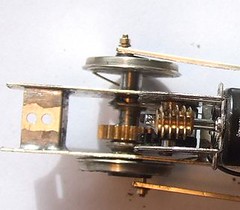
Plastic washers
Bit of a handy hint here: If you want to check things on a chassis that uses Romford crank pins, don’t solder the washers on, use bits of cable insulation. That way you can remove the rods easily during the fettling stage.
I had to force these bits down some tweezers (the tapered bit) to expand them a little but after this they slipped on and hold well.
The chassis can now be run under power to see where the tight bits are. A little reaming of the bearings freed everything up. Those frames are very tight on the back of the wheels though at 12mm apart (measured in the inside faces). Some slightly narrower spacers will be etched for production runs to allow builders the choice.
Wednesday, November 14, 2007
Chassis with rods
Moment of truth time. With all the wheels and the cranks on the con rods were fitted and the chassis tentatively rolled forward.
It worked !
Everything went round as expected. Actually not as expected which was lumpy with the whole lot locking up at some point. Instead it rolled reasonably smoothly. OK, the rods fell off after it rolled the length of the board but then that’s why you have to fit the washers to hold them on.
It worked !
Everything went round as expected. Actually not as expected which was lumpy with the whole lot locking up at some point. Instead it rolled reasonably smoothly. OK, the rods fell off after it rolled the length of the board but then that’s why you have to fit the washers to hold them on.
Tuesday, November 13, 2007
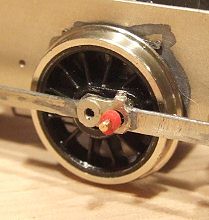
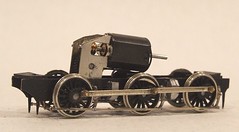
Crank it up
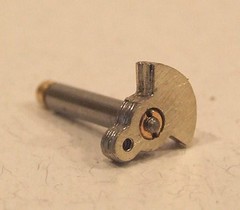
Great big whirly cranks are a nightmare on model locomotives. Most kit-makers suggest something that flaps around on the chassis with loads of slop in the coupling rod/crank pin interface. This works but doesn’t look nice. It’s a good way to get yourself some jerky running too.
The cranks are much better. A development of Mercian’s Barclay cranks, they are made of laminations which fit on the end of a Romford axle. This sorts out the quartering and keeps things tidy.
I didn’t use all the laminations this time – P4 modeller may need a bit more chunkiness but these have to tuck behind OO spaced rods.
I screwed the first two bits of metal to the axle as they have the square centre holes and then held the others (with round holes) to them with sprung tweezers. Solder is run around the edge and then cleaned up.
Result – a nice chunky crank. A little bit of filler would hide the laminations but under the footplate, behind the steps, no-one will notice.
To finish the job, I tapped the crank pin hole to 10BA so a Romford pin will screw in. It could just be soldered in place but I thought I'd go all engineering.
Monday, November 12, 2007
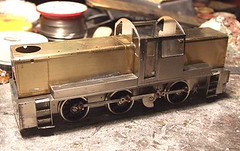
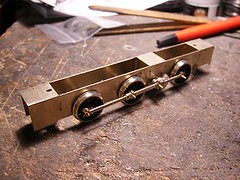
Class 14 chassis
Progress on the 14 has been slowed by all this boat stuff but I know a shift on is needed. The show the model needs to be ready for is only a couple of weeks away.
Anyway, here’s the chassis. There isn’t much to say about this really, Solder the spacers in and then the bearings. Finish with the overlays.
Of course there are niggles. Trevor has had some new spacers etched for OO modellers. I didn’t like these and used the originals, which are tight on the backs of the wheels but work OK. They fit better too as the new versions don’t have the tabs in quite the right place as far as I can tell.
The overlays were soldered by tinning the backs and also the chassis. A good brush load of flux later and some gentle heat around the edge joins the two. Superglue would work just as well and be easier to clean up but I’m supposed to do these things “properly”.
Sunday, November 11, 2007
There's a hole in my wallet
Day 2 – Time to spend some money.
Despite not buying a single kit I still managed to damage my bank balance today . My plan was to get all the difficult to source parts for two boats, a 1/24th Brede Lifeboat and 1/12th Cygnet fishing boat. The later is easy, all I needed was the propeller – everything else is pretty standard.
The lifeboat though is a different kettle of fish. I want to do a proper job on this with all the detail possible. The prototype has twin props and tiny little rudders. If the model is to go around corners, some steering via the motors seems like a good idea. Action Electronic provided just the stuff. I laid out the plan and he suggested the kit. Props came from Prop shop while shafts and couplings came from Scoonie. A radar unit was found on Anglian Models stand hanging from the Robbie fittings rack,
While I don’t plan to start the boat for at least a couple of months, this show is the one chance I have of getting all the bits at one go. In fact I think I’ve bought the majority of the bits I need for next years boat modelling today.
One of the most impressive parts of the show had little to do with boats and a lot to do with people. As it’s Remembrance Day, a 2 minute silence was observed at 11am. Over a thousand people were in the hall and all fell silent at the appointed time. I know there are ceremonies around the country but being somewhere where people chose to observe the silence is particularly moving. By chance I found I was looking at a German fire boat and a warship of some description at the time. Poignant.
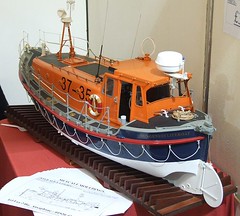
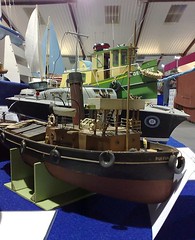
Anyway, the photo shows the winner of the “Model Phil would like to build” for this event. It’s a Metcalf Mouldings “Alice Upjohn” lifeboat. This looks fantastic. It’s 1/12th scale but still a manageable size. At £325, the kit is not badly priced considering what you get – over 800 parts including several hundred whitemetal fittings. The detail is superb. Maybe next year…
Saturday, November 10, 2007
Boat show, Day 1
My first day on the stand at the boat show this year. It’s very busy. In fact I hung around the stand most of the day as you couldn’t really walk around the exhibition hall very easily.
Lots of nice things were said about Tomsk & Pigeon Pie. I managed to get both of these on the water too. Let’s face it, tables full of model boats are nice but seeing them float is important. Most people don’t bother but I think it’s a shame not to have a go at least once. But then I only like playing trains when I have an audience…
Go on, have a look at the pictures in Flickr.
Friday, November 09, 2007
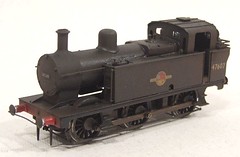
3mm Scale Jinty
I thought I’d finished the working week with my favourite sort of post – a picture of a successful model completely finished.
The Jinty has been a nice kit to build. OK, some alignment tabs would have been nice, as would wider chassis spacers. Apart from that it’s no problem and I enjoyed it.
I’ve finished my model as a reasonably clean example. A few different shades of brown were misted on with the airbrush to take the edge of the colour but it’s not one of my really filthy examples.
At the end of the day, if you want a 3mm scale Jinty, this kit comes highly recommended.
Thursday, November 08, 2007
Boat show
Just a quick trip out this evening to drop some boats off for this weekend’s International Model Boat show.
I’ve got three models on display, Pigeon Pie, Little Miss Minty and Tomsk. The later makes it on to the stand due to it’s current appearance in a magazine. I think people like to see things they have seen in print for real so Tomsk & Minty are an added attraction for the Knightcote Model Boat Club stand.
Each model I’ve dropped off has a little card with it containing information on the kit, motor and power source along with a few notes. I know I like to know a bit more about the models I’m looking at and get frustrated when there is no information provided. Worse, the people on the stand never know about the model either. The builder will be “around somewhere” but never seems to return.
This extra info to me is part of exhibiting. I want people to get something from seeing my models other than just looking at another boat. With 300 to chose from it’s hard to stand out from the crowd. While some will look and dream at the larger and more complex vessels on display, other are realistic and use the visit as a chance to decide on the next project. A bit of info helps this enormously and might just encourage a trip to one of the ver handy traders !
Wednesday, November 07, 2007
Putting a brake on it
I’ll be honest, chassis work isn’t my favourite part of building a locomotive and doing the brake gear is my least favourite part of this.
Brakes have to go on after the chassis has been painted which makes the soldering difficult – you can’t clean flux off the metal any more without dunking the motor in water. Even I know that's a bad idea.
So, I made up the brakes and hangers and attach them with the smallest amount of solder possible. I had to use a little flux and in this case, solder paste. But lingered with the iron to boil as much off as possible.
Fitting the pull rods strengthened everything up a lot and certainly makes the whole thing look better. Perhaps it’s because RTR when I was a newer modeller didn’t have them but I find pull rod appearing in front of the wheels looks really “finescale”.
Sandboxes are glued in place. I ignored the pipes fearing they would just get in the way. It’s tough enough to keep the cross wires on the pull rods out of the pickups without any other fiddly, but difficult to spot, bits near electricity.
Tuesday, November 06, 2007
Sloppy chassis
Returning to the Jinty chassis, all I had to do was dismantle it, paint and then reassemble.
This was fine but during the rebuilding I took the opportunity to get some spacers in between the wheels and the frames on the drive axle. I had about 3mm of side-play !
I think some wider chassis spacers would have been a good idea here. I used the widest ones in the kit but they were still too narrow, even on the compensated axles which have thicker bearings. Strange though as the kit chassis was designed for 14.2 gauge. Perhaps the designer assumed we all use Romford wheels (I wish).
Having said this, under test the chassis ran around the layout so I can’t complain too much. I still sorted the powered end though just to be sure.
Monday, November 05, 2007
Lighter shade of brown
For various reasons I wasn’t able to stray very far from the computer this weekend. Good news for my modelling I suppose as I could have little bursts of activity.
One job done was finishing the lighter (dumb barge) built for towing behind Tomsk & Puffin. My Dad built it and I had to paint it.
First coat was brushed on Humbrol black. I would have sprayed but couldn’t be bothered to set up the airbrush. Besides, brush painting is relaxing when you don’t have to worry about accuracy.
The airbrush then added some dirt in various shades of brown. I was aiming for a rusty hulk look. Difficult when the model is made of wood.
The load is a mix of lead (2kgs) then polystyrene, newspaper, sawdust and finally model railway ballast.
The final touch was dry-brushing the inside with rust and pale grey.
Sunday, November 04, 2007
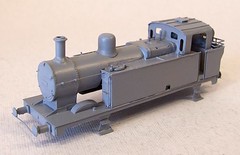
Class 14 kit
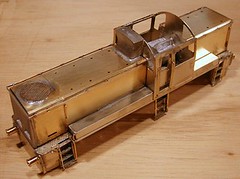
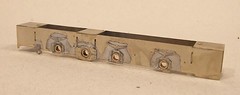
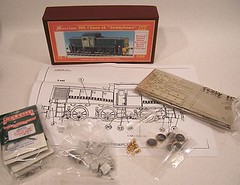
OK, here it is – the Mercian Models Class 14 Diesel kit. I know at least one person out there is keen to see this, so here goes…
This is what I have. There are still a few minor details parts missing but these will follow very shortly. The kit is etched in nickel silver and basically shot down from a 7mm scale kit. The picture on the box is the O gauge locomotive.
My task is to build this and have it ready for Trevors stand at Warley in a months time.
I have an advantage as I built an earlier version of this a couple of years ago. As I recall it went together very well. The bad news is I don’t really remember it. And there are no instructions, I think I’m supposed to write these as well.
Watch this space.
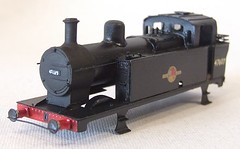
Numbers up
Transfers don’t half improve a model. The trouble is they can ruin it as well. Wonky numbers do nothing for the look of a locomotive no mater how good the metalwork is.
I get around this by making a guide from scrap plasticard - only a rectangle but it works.
For the Jinty I made it deep enough to sit in the footplate with the top reaching the bottom of the numbers. Suprisingly this works well and is easy to use. Even doing the spacing by eye doesn’t cause me too much grief.
The process is quicker, even allowing for making the guide, than fiddling around doing everything by eye. Much less swearing too !
The numbers on the front are hand painted ‘cos I don’t think I have anything small enough and even if I did, putting them on would be a real pain. As long as there is something on the front plate the eye seems happy, or at least mine is.
The totem is harder. I have only two sizes on the 3mm special sheet from Fox Transfers. One was much too small and the other slightly too big. I went for the later as I felt it looked better on the model. BR seemed a bit haphazard when they picked the transfer from some locos too so I won’t be losing sleep of this.
After transfering, the body was given a quick spray of satin varnish. Once those numbers are on I want them to stay there !
Final touch is the smokebox being hand painted (can’t be bothered to do the masking) with mat black. This contrasts nicely with the rest of the body and looks very authentic.
Saturday, November 03, 2007
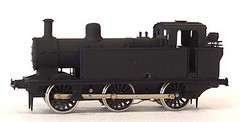
Black
Now in black, the Jinty looks strange sat on top of it’s chassis. Without any brake detail and with those shiny wheels and coupling rods, the whole thing looks toylike.
I hope it looks better once the transfers and underframe detail go on.
I hope it looks better once the transfers and underframe detail go on.
Famous Tomsk
Look out for the Model Boats Kit Special issue for a review of the George Turner "Ten quid wonder" kit that I turned into Tomsk.
Then wonder at the amazing Severn Lifeboat kit that is extensivly reviewed. I've seen this model and £1400 doesn't sound very much when you see what you get.

Then wonder at the amazing Severn Lifeboat kit that is extensivly reviewed. I've seen this model and £1400 doesn't sound very much when you see what you get.
Friday, November 02, 2007
Jinty in primer
Now it’s in primer I have a little more work to do.
Both bits of the boiler I bodged in when I cut too much out need filling. I expected this but wasn’t sure how much would be required until the primer went on.
The other problem is easier to solve, a bit of excess solder below the beading at top of a tank side. A few seconds work with a needle file will fix this.
Apart from this, I’m happy.
Subscribe to:
Posts (Atom)